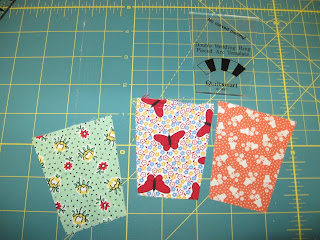
 After cutting out slightly over a million wedges you take 6 and sew them together. I'm not sure how big I will make mine, so I don't know how many to cut.
The Quiltsmart comes in a big sheet. After you've cut out the arcs, sew them onto a pieced arc. Quiltsmart even has a line to sew and also a line to trim for seam allowance.

 Here is one that's been sewn and trimmed.
Now it's time to turn them right side out. This is why I put it away in the first place. It seemed like it took forever to turn them right side out. Well, a few weeks ago as I was turning out apron strings I realized I could use this tool for that. The lights are now on! I don't know why it took me so long! Now it takes 10 seconds as opposed to 5 minutes per piece!
 Now it's time to iron (press) them onto the white background. Quiltsmart fuses right on, not as tightly as fusible webbing, but enough for a temporary hold.

Last, use a small zig zag stitch and clear thread. I like the Sulky. Machine applique the pieces down.

There will eventually be a small triangle piece sewn to the four corners of each block to join them together. I'm not sure if I'm going to use solid fabric as suggested or if I want to use more of my scraps. The package of Quiltsmart comes with enough for a baby quilt or two table runners. I'm not sure what size I'll do, but you can also buy it by the panel and I noticed a store near my house carries it that way so I may make it bigger.
I really want to try the Apple Core, but I'm not sure how it would work. Maybe I'll look for a tutorial online so I can see if it's easy. I know this all sounds like a commercial, but since I'm always looking for easy ways to make classic patterns I thought other people might as well and I wanted to show you how easy this really is!


11 comments:
I've always loved double wedding ring quilts too...what a great time-saving technique!
This looks like a great technique for a double wedding ring. When I was a new quilter I took a class on the traditional method. I made one block and then quit.
I made a flag wallhanging using the DWR quiltsmart. I also have started a Hawaiian quilt using this method. Our guild is having John Flynn coming to teach DWR with his template method this Fall. I think everyone eventually wants a DWR in their collection. So traditional and comfy.
I might have to try the DWR. I did make the apple core and it went together real nice.
http://threadsofmine.blogspot.com/2008/10/quiltathon.html
I used Quiltsmart for a drunkard's path flannel quilt and I was surprised at how easy it was. I will have to see if I can find a picture and put it on my blog. Great quilt blocks. I might be willing to try a DWR if I could do it this way: a million pieces??
That is going to look so pretty! I love Quiltsmart and I love doule wedding ring quilts. I have an award for you on my blog! =)
Now that is really clever. I love love wedding ring quilts. This is fun. I can't wait to see more.
A really good explanation
...UH DUH!! I did not know that
is how it was sewn,,,!!!
WOW!! You are so ambitious! I have no clue how you get so many beautiful quilts done with kids!!
This is a great idea!! You have helped me solve a problem I'm having with this block with your great tutorial. Thanks!
Kirie
Post a Comment