Thursday, September 29, 2011

A sneak peak

Here is a sneak peak of the cupboards. They look really yellowish in this picture. I am debating about painting the wall also. My husband has tomorrow off, so hopefully we can get the moulding on top and touch up.
I wasn't positive about the glaze at first. I don't ever like a lot of glaze. I don't like it to look messy. It is growing on me though. I also need to decide what curtains to make. I was going to do Roman shades and had bought a kit with all the stuff to make them. Then it got recalled. I'm trying to decide if I want just short ones that hang down, but our table is by the window you can see in this picture and my kids don't have the cleanest hands. I need something that will cover the window since they face west and it gets warm as I'm making dinner in the summer.


Ok, so I showed the bathroom wall awhile ago. I need a color to go with it. It usually looks gray, but around 5pm it looks kind of blueish. I really like apple green, but I'm not sure how that will look during the blueish time of day. We'll have to see... I'm open to suggestions!

Friday, September 23, 2011

Roomspiration Dining Rooms Party!


I know I've showed the dining room before, but today I'm linking up to the Roomspiration Dining Rooms Party today. I'm not totally finished in this room, but I'm working on it. Here is the before picture. Pretty boring, right? We decided to paint our dining room Tobacco Road by Kwal. It's kind of a goldish tan. We added box moulding to the bottom and also chair rail and crown.


Here's the semi finished product. The curtains are from Home Fabrics. Have you been there? I love it! These curtains were $10 a panel in the clearance section. You can't make them yourself for that price!


I would love to get a new dark wood or black table. This is an inherited one and there is a family debate about what to do with this one. Since this picture was taken I have painted some black shelves that are now on the wall on the left side of the picture. i can't find my camera though to take a new picture of them. I also need to work on a centerpiece for the table.


This week I've been working on painting our kitchen cabinets. I'm almost finished. Hopefully I'll start glazing today and this weekend we can put the doors back on and add the moulding. Then of course I need to make curtains and paint the walls- probably not in that order! Hopefully next week I'll something ready to show!

Thursday, September 15, 2011

A New Quilt

We just put our two year old in a big girl bed. She loves it. I'm not completely sold on her 1- being old enough for one and 2- that this is all going to work out. When my husband and I go up to bed at night we usually find her sleeping on the bed, but with the light on. She claims there's scary guy in the closet. I can handle the light on though. The other thing is that there are several times when she wakes up with different pajamas on. She must decide she wants different ones and then switches after we go downstairs. The other day when she woke up from her afternoon nap she also had pjs on. Today at nap time I could hear her moving around. I went to check and she had the baby wipes and was pulling them out. She loves to pull them out. I'm sure if we gave her a package for Christmas and let her do as she pleased with them she'd be thrilled.

Anyway, a new bed calls for a new quilt, don't you think? Her walls are Kwal's English Sage. I had lots of scraps and quarter cuts in that color, pink, yellow and blue. Let's hope my quilting bug keeps up and I finish before I'm ready to repaint!

Monday, September 12, 2011

Painted Cabinets

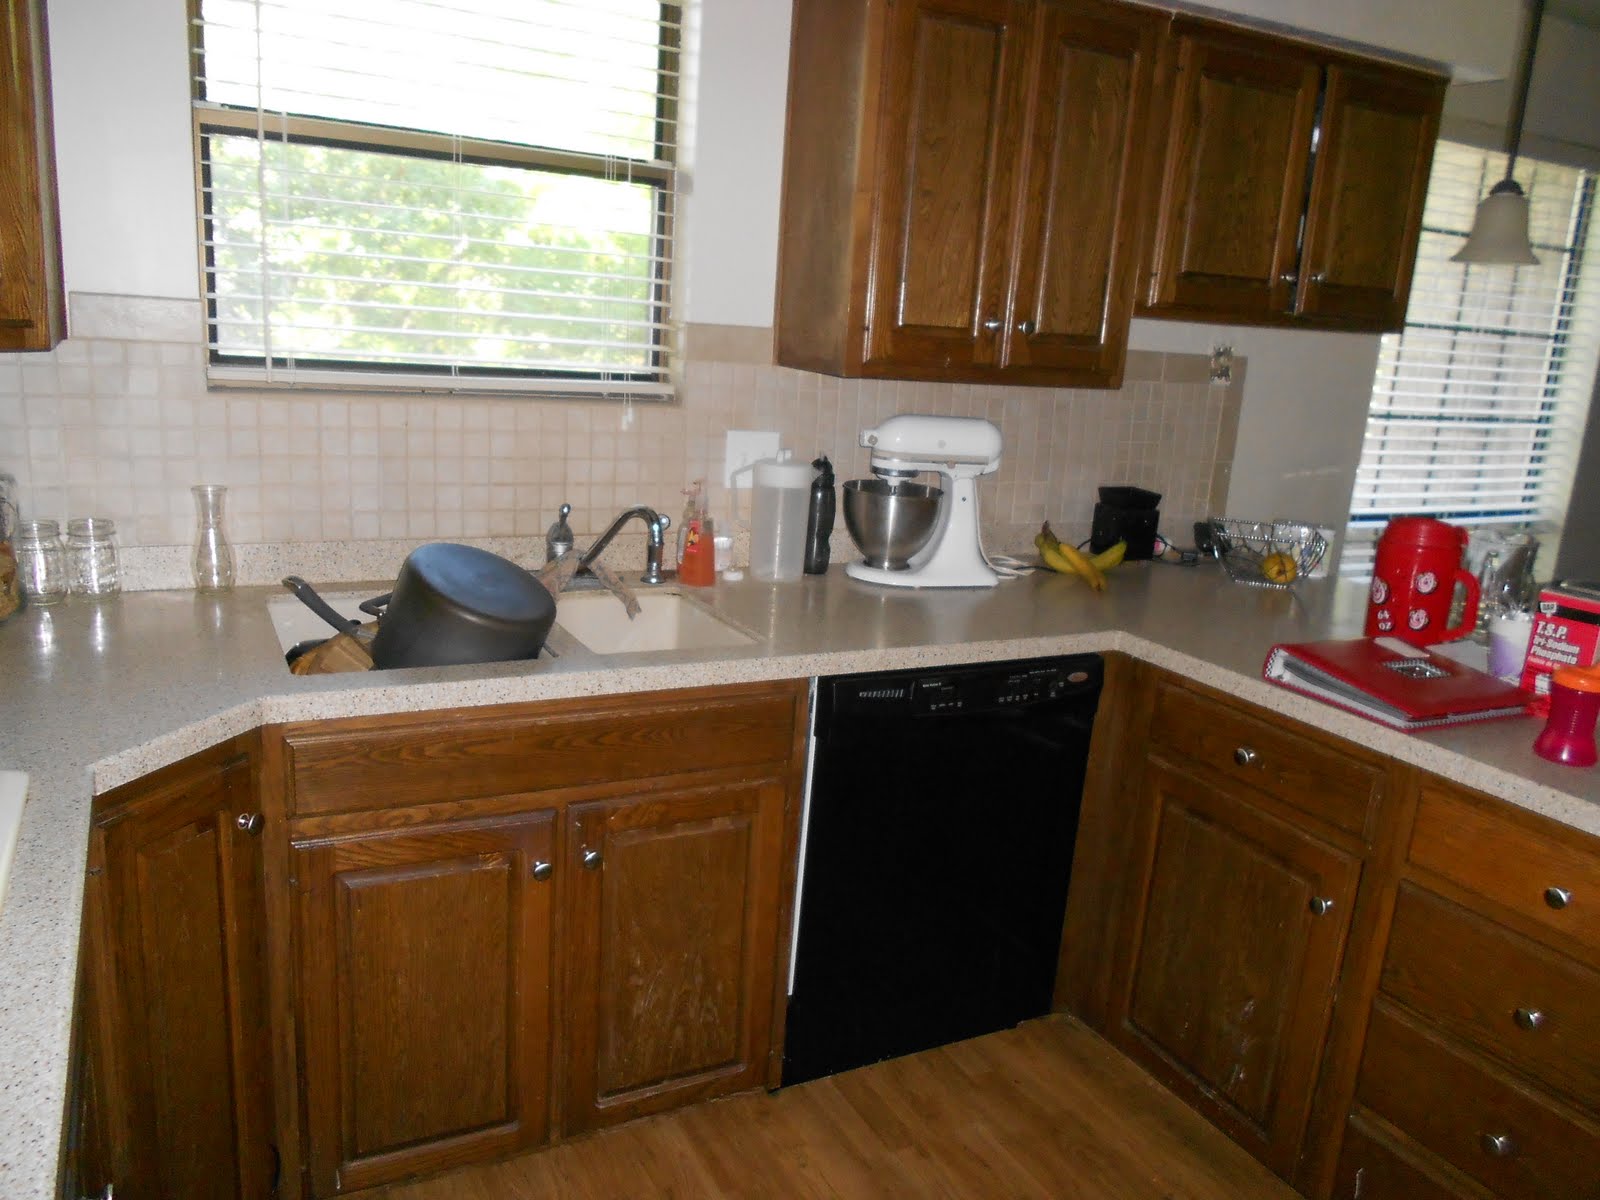
Welcome to my kitchen. My messy, messy kitchen. Don't fret, the dishes in the sink are clean. I can't stand the smell of dirty dishes.

I have been thinking about painting my cabinets. Here they are, in their true 80s glory. A year ago our dishwasher broke. It was a lovely almond color. As you can see on your left, there is an lovely almond stove top. The ovens and fridge are on the wall I'm standing against to take this picture. Also, a beautiful, 80s almond color. I hated them. When the dishwasher broke I got a black one. Recently our double ovens broke. My friend had double ovens in black. She had totally remodeled her kitchen and was getting rid of fairly new double ovens. I snatched them up, along with a black gas stove top.

When I went to go pick up the ovens I got to see her brand new kitchen and fell in love. She had beautiful cream cabinets with a slight glaze on them. It was the push I needed to go buy paint and all the supplies to paint my cabinets.

This is the color, although I hope it's slightly darker on here then it will be in real life. It's Kwal's Sunkist Ridge.

It's all been sitting in my garage for a month. I'm a little undecided on the color (I know, a little late now). But I'm wondering if it will look ok with the counter tops. I prefer dark counter tops with light cabinets, but that's not in the budget now. These are light with a creamish and black flecks.


The thing that is holding me back the most is the cleaning of the cabinets. I've heard I need to use TSP and that sounds like a huge job. The kitchen isn't that big, as you can see, and I plan to use a paint sprayer for a smooth finish. I just need to get started and do it. I really want it done, the actually doing it part is the problem. Now for a little motivation...

Thursday, September 8, 2011

Model Homes and Up

On Monday we were visiting with my mother-in-law and some other family members. She mentioned that the Up look alike house was just down the street. She said it was closed now, but we decided to drive past it. Now, I haven't seen the show (um... I also haven't seen Star Wars). My kids have seen the show and liked it. Maybe I'll have to rent it this weekend. Is it weird to rent an animated movie just to see the animated house in it? We were pleasantly surprised to see that it was open. Maybe because it was Labor Day. Anyway, we went inside to take a tour. Now, I like the house on the outside... except the colors. I'm more of a traditional girl than a bright green/ pink/blue/ yellow, but I do love the style.


This was a bedroom in the basement. I didn't get any more pictures than this because there were a lot of people in there, but I wish I would have gotten a picture of the kitchen. I loved the white cabinets and the turquoise appliances.


If you want to see more pictures of the Up house, check out Hooked on Houses.


Because this was in a neighborhood that is not finished yet, there were three model homes. My husband hadn't believed me when I told him that wallpaper was coming back. I also had to take pictures of some of my other favorite things.


I loved the frames hung on door hangers here.


This is the wallpaper in the powder room. I loved it!


It was a small room, but so fun!


I need curtains for my kitchen windows. These Roman Shades didn't look like they actually function, but I thought they were cute anyway. I also like the tassels hanging down.


I loved the checkered wall in this and also the tassels on the curtain.


This is wallpaper in a different powder room in a different house. I've seen stencils that are very similar to this. It's just so much fun to see pattern on a wall.


I thought this was interesting and fun. The lines in this wall are real ribbon. It is just tacked on with thumbtacks. You can't really tell in the picture, but where the ribbons intersect is a flower with a thumbtack in the center, holding it all on.

Monday, August 22, 2011

The REAL Stencil

So I had to switch stencils. I was cheap and bought a cheap stencil at Hobby Lobby. BIG MISTAKE. The registration marks were so small it was hard to line up, the stencil itself didn't move well around the corners or top of the wall. It was a mess. I broke down and bought one from Royal Design Studio. So much easier. The registratoin marks were huge and also part of the pattern. It was so easy to line up. It also came with a smaller stencil to do along the top of the wall. Here's the finished wall. I couldn't get the whole thing because it's a small room. I just did one wall. I still have to paint the molding and door. I also accidently got gray paint on the cupboard. I was going to paint that anyway, just not now. It will now be painted a little sooner than planned.

Now, to decide what to hang on the wall.

Monday, August 15, 2011

The cheap footstool

You probably shouldn't ask about the powder room. It's been rough. I was cheap and bought a cheap stencil. The border is way too thick and I can't get all the way to the bottom, top, or turn a corner. Also, I broke it when I was cleaning it. I either need to fork out the money and buy a more expensive one, or do something else totally different. Until then, I have another project to work on and one less bathroom.

When I saw this in the Ballard Designs Catalog I knew I needed one. However, I didn't have any desire to pay $129-$205 for it. I remembered that when I was little my dad made some for our house. I could totally do that, right? I went to Home Fabrics in Salt Lake. They were having a half off sale on all their fabric. I bought this for $3 a yard. I also got enough to make curtains for my kitchen. The fabric appears a much brighter red than it really is.


I wanted it bigger than the ones at Ballard Design, because I wanted more than one person to be able to use it. I'm about 5'3 (although I think I seriously may have shrunk) and my husband is about 6'3. We needed a wider one so that we could both use it. I bought a foam pad that was 22x22. I'm also lazy so I decided that that would be the size to cut the wood. That way I didn't have to cut the pad. Then I just layered the fabric, the pad and the wood and stapled it all together.


I bought the legs at Home Depot. They were the most expensive part of the project. I painted them Heirloom White by Rustoleum. They may turn black later. Anyway, now we have a super cheap foot stool!

Wednesday, August 10, 2011

Powder Room

Yes, this usedto be a sewing blog. Now, I have a two year old who loves to push buttons on my sewing machine while I sew and is very interested in the iron. I am making a quilt for her new bed, but it's slow coming since I have to do it while she is sleeping. That time is getting shorter too. In the meantime, I'm redoing my powder room. Here is the before. Are you bored yet?


The paint is a putrid 80's color of some sort. This bluish splotch is me testing some oops paint I bought for $1. It wasn't this blue in real life. It was more of a dull, wet cement color so it didn't get to stay.


I painted the bottom white and I'm in the process of stenciling over the top in a light gray/blue called Cloud Nine from Kwal. It's slow going, but so far I love it.


Not quite sure what to do at the bottom though. It doesn't go all the way to the sides or bottom and the stencil doesn't bend very well.


Hopefully this bathroom won't make you want to die of boredom anymore. Ignore the ugly, putrid door. I ran out of white paint.

Friday, August 5, 2011

Full DIY Mode

The last few days I've been debating. Do I stencil our powder room, or do I wallpaper. I love this from The Mustard Ceiling.

Wednesday, June 15, 2011

My Favorite Yard Sale Find

I love yard sales. I love to redo furniture and make it my own. I've showed pictures of this hutch before, but I've linked up to the Best Yard Sale Finds Ever at the Nesting Place. I bought this hutch at a yard sale for $40. I didn't really want the top part and it's now being used as a garage for our vast collection of Tonka trucks. I wanted a sofa table. When I put it on the back of our sofa, it was a little too high so I decided I'd put it in this corner of the room that is kind of a waste of space. It may not be a usable space, (there are stairs that come down in the bottom left corner) but it's a decoratable space!

The hutch sat in this boring state for a few months. I couldn't decide what I wanted to do. At the time we were looking for a new sofa and in the stores I had seen some colored furniture that I loved. Did I dare to go that bold though? I thought of doing it antique white and glazing it, plain black, but I then I gave in. I decided if I hated it, it was just paint and I could always repaint it. I decided on this teal color.

I restained the top in a darker mahogany color. It wasn't as hard as I thought it would be, but I was glad I didn't have to do the legs!

Here is that corner of the room now! That black frame is also a yard sale find that was brass. Thanks for coming to my little sewing/ decorating site!


Monday, June 13, 2011

More Pillows!

When we bought our couches last year I didn't like any of the pillow choices. We decided to just have the pillows match the couch and I would recover them later. Well, I am now on the third pillow recover and I think I've found what I like best. I did an orange cover before and didn't love the fabric. Also, I used quilting fabric and it kind of slipped around on the pillow form when we actually used the pillow. I went to Home Fabrics and found this fabric. It wasn't quite what I had in mind, but it's the right colors and it doesn't slip around when you lay on the pillow. I kind of wanted a bolder fabric, but this allows me to make other pillows in bolder fabrics to go along with this one.


Friday, June 10, 2011

Picture Frames

I love picture frames but they can be expensive. I want to do a gallery wall going up my stairs from my entry way to the second floor. For that I need a lot of picture frames, but I don't want to pay$10-$40 each. So I've discovered the joys of yard sales and spray paint. All these frames were bought for $2 or less at yard sales. I have bought some at DI in the past, but they are getting too expensive for me. Once I find a picture frame I just paint it the way I want, get cheap prints at Costo and I have a decoration for super cheap.


Wednesday, June 8, 2011

Pillows!


I'm all about short projects lately. Short meaning projects I can get done while a certain 2 year old sleeps. Have you seen all these pillows in the stores lately? The ones with the felt flowers? They can be expensive. I've seen them for as much as $40 each. I believe I showed one earlier that was all felt. Then I found this Amy Butler tutorial and made this one. It was easy and fun. Now I want to make more for every room!

Monday, June 6, 2011

Home Improvements

When we moved in we knew we had a lot of work to do. Over the past few years we've realized that is an understatement. Here you can see our front doors. They look ok, right? I haven't loved the double doors. Sure, it was great on moving day, but it looks weird if you only put one wreath on it. Also, I've found people get confused about which door is the one opens. Who knew? The worst thing about these doors is they only have those four tiny windows at the top for letting in natural light. They open into an entry way with a formal living room on the left and a formal dining on the right. There is no light and very dark entry.
(I can't get this picture to go below the other, but we've replaced the double doors with this. Hopefully our door guy will be back soon to finish. We love it and it makes for a much brighter entry.) In this picture you can see the banister going up to the porch is missing at the bottom. Well, a week after we moved in we took out the carpet in the formal dining room and added wood floor. My husband, dad and I worked on it ourselves. As my husband had a long piece he took outside to cut he hit the rain with the tip. Barely. The whole thing fell off. It was rotten all the way through. This was just the beginning.


Here's a better picture of the railing. The part that isn't falling off.


This year is the year we've designated to help out our overgrown yard. We've replaced the rotton railing with a vinyl one. Hopefully we can get our drip system working and I can plant flowers in my flower boxes soon!

Thursday, June 2, 2011

I'm Back... I hope

Sorry for the wrinkled fabric below, but I wanted you to be able to see what the fabric looks like up close and took a picture of the scrap. Obviously, I didn't iron it first. Just keeping it real!


Maybe I'm back. I hope. Three little kids are really keeping me busy. I've been doing projects, both sewing and home related, but I haven't been posting them. I'll try to better. Maybe blog at least once a month?

In April I decided I'd had it with my plain white Roman shades. We put them in when we first moved in because I wasn't sure what to put there and they were cheap. It looked like white sheets hanging in my door. I decided to cover them. I went to Home Fabrics. Have you been there? I love that store. Cheap decorator fabric. This fabric happened to be on sale for $3 a yard. It's thick, heavy fabric. I debated. I kind of wanted a bold floral, but I also wanted to do pillows and other accessories and I didn't want it to all match. I went with a teal and tan stripe. Kind of boring, but better than plain white, right? Sorry you can't see the fabric very well in the pictures.


It's kind of a dim day outside. Anyway, I measured the existing shades for the pattern and then sewed the new fabric right on top of the old. These do have wooden (at least I assume they are wood) dowels inside the folds. Every time I got to one I backstitched and then didn't sew over it so they'd keep their shape.


Here is one down. They are so much thicker and darker. Before I wondered if people could see through the other ones. Not anymore!


Today I have plans to make my boys ties. I'll post pictures if that actually happens!

Wednesday, March 30, 2011

A project finished (almost)

Once again the time has slipped away from me since my last post. Part of that is because my 4 year old had a septic knee and was in Primary Children's Hospital for 5 days. Three surgeries, two weeks of picc line and one week of oral meds down we are toward the end. Only one week of meds to go and hopefully all this will be cleared up. Last time I posted I showed pictures of our newly painted dining room. I am now in the process of decorating it on a dime. I love to find cheap ways to decorate so that when I'm tired of it, I don't feel guilty finding new decorations. I saw this in the Ballard Design catalog. I loved them because they take up a lot of space on a blank wall, but as you can see they are not exactly decorating on a dime worthy. So I made some myself for about $5. We already had this wood laying around from when my husband fixed our sun room a few years ago. I had him cut it in 12x12 squares for me. Then I painted the edges black.
I found 12x12 scrapbook paper I liked and used spray adhesive to attach the paper to the wood.

And then attached alligator claw hanging things to the back. Of course, this idea wasn't mine. I saw it on several different blogs and one of my friends did it as well. Again, I love the space it takes up!


To the right in the picture you can see the curtains. Curtains are also not decorating on a dime worthy. These ones I found at Home Fabrics for $10 a panel. I went there looking to buy fabric to make my own and found these on clearence. Now I need curtains for my living room. I still kind of want to make them so I can get exactly what I want, but it's looking like making them is as expensive as buying them! Do you have a store that you love that sells home decor fabric? What online stores do you like?